How to Migrate from Mailchimp to Klaviyo: A Step-by-Step Guide

Quick Summary Effective product marketing in the beauty/skincare, food/beverage, and fashion industries calls for an optimal email marketing strategy. And for that, you need the right email service provider (ESP).
Utilizing the right email tool can help you drive more sales and retain more customers. That's where Klaviyo comes in. It's a more robust fit for e-commerce than Mailchimp is. And though Klaviyo pricing may be higher than Mailchimp's, Klaviyo users who switched from Mailchimp report an average increase of 46% in total store revenue.
You likely will, too, if you make the switch, and you'll never see any hidden fees. Without Klaviyo's support, your emails may not be generating as much revenue as you'd like.
We know that transferring all of your email data sounds overwhelming. It will require some work, but the process is straightforward. In this article, we'll discuss everything you need to know for migrating to Klaviyo from Mailchimp. We'll include some quick definitions for those of you who may have just inherited e-commerce duties.
Preliminaries
Don't Delete Your Mailchimp Account Right Away
Throughout the migration process, your Mailchimp account will need to remain active in order for the Klaviyo integration to work properly. You will also need to access the account to retrieve various pieces of information.
Keep your Mailchimp account active until the very end. You can delete it once you've migrated all of your data and confirmed that everything in Klaviyo functions as it should.
Understand the Differences in Terminology Between Klaviyo and Mailchimp
Before you migrate to Klaviyo from Mailchimp, it's a good idea to know the differences in how they label things.
The table below lists some common terms in Mailchimp and their counterparts in Klaviyo:

Update Your Contact Lists in Mailchimp
Before you migrate to Klaviyo, update your contact lists in Mailchimp. In Mailchimp, delete any subscribers who haven't engaged with your emails in the past six months.
Then you can sync the two platforms, which will allow your data from Mailchimp to automatically be transferred to Klaviyo. This will give you a clean contact list to start with once you begin sending emails from Klaviyo.
Make sure you don't have any scheduled Mailchimp emails before you start the migration. Klaviyo will only sync with Mailchimp campaigns that have already been sent.
Once your contact list is updated, you’re ready to start migrating to Klaviyo. The migration can take anywhere from a couple of hours to a couple of days depending on how much data you have and how many templates you need to re-create in Klaviyo. Don't be alarmed, though — the process will pay off in the end!
The Four Steps of Data Migration
1. Update your integrations with Shopify (or whichever e-commerce platform you use).
You'll want to make sure that your e-commerce platform (the tool you use to manage your online store) is no longer connected with Mailchimp before you complete the migration.
2. Integrate your new Klaviyo account with your Mailchimp account.
a. To do this, you’ll need a new Mailchimp API key. You can get a new API key by clicking your account name in the bottom left corner of your Mailchimp account. Go to Account and click API Keys from the Extras menu. Click Create A Key. Highlight the key and copy it by pressing Ctrl+C on your keyboard (or Command+C for Mac users) or right-clicking your mouse and selecting Copy.
b. Once you have the new API key, log into your Klaviyo account and go to Integrations. Search for Mailchimp and click Add Integration. Paste the Mailchimp API key by pressing Ctrl+V on your keyboard (or Command+V for Mac users) or right-clicking your mouse and selecting Paste.
c. Toggle open the Advanced Options. Choose one of the following options:
Collect open-and-click data for MailChimp campaigns — this option allows you to sync Mailchimp engagement.
Create Klaviyo lists from MailChimp lists — this option allows you to sync all of your existing Mailchimp lists.
Only sync specific lists — this option allows you to specify which Mailchimp lists you'd like to sync.
d. Click Connect to Mailchimp. Your data will begin syncing within a couple of minutes.
3. Import your Mailchimp tags into Klaviyo.
If you used tags for your Mailchimp contacts, you can migrate them to Klaviyo. Klaviyo doesn't sync Mailchimp tags automatically, so you will need to export them from Mailchimp and upload them to your Klaviyo account.
Once your tags are uploaded to Klaviyo, they will be saved as custom properties. Custom properties are attached to profiles, which are the records that Klaviyo maintains for each of your contacts. You can create segments based on your custom properties and use them to add filters to your Klaviyo flows or dynamically display content to specific subscribers.
Examples of custom properties that you may want to add to your Klaviyo profiles are:
Preferences around what kind of content subscribers would like to see or how often they would like to receive emails
Subscribers who have the same birthdays
Subscribers who live in the same geographic regions
4. Re-create your Mailchimp templates in Klaviyo.
You can use Klaviyo's drag-and-drop template builder to re-create your Mailchimp templates. This will ensure that your emails are mobile-optimized, responsive, and easy to adjust for future campaigns.
If you don't want to manually re-create your templates, you can export your Mailchimp templates as HTML files and import them into Klaviyo. Before you do this, you'll need to update your template tags (for example, the "first name" tag), since they are different in each platform.
It is especially important that you have the proper unsubscribe tag. Klaviyo won't let you upload an HTML file without it.
The chart below shows the most common Mailchimp tags and their corresponding tags in Klaviyo:
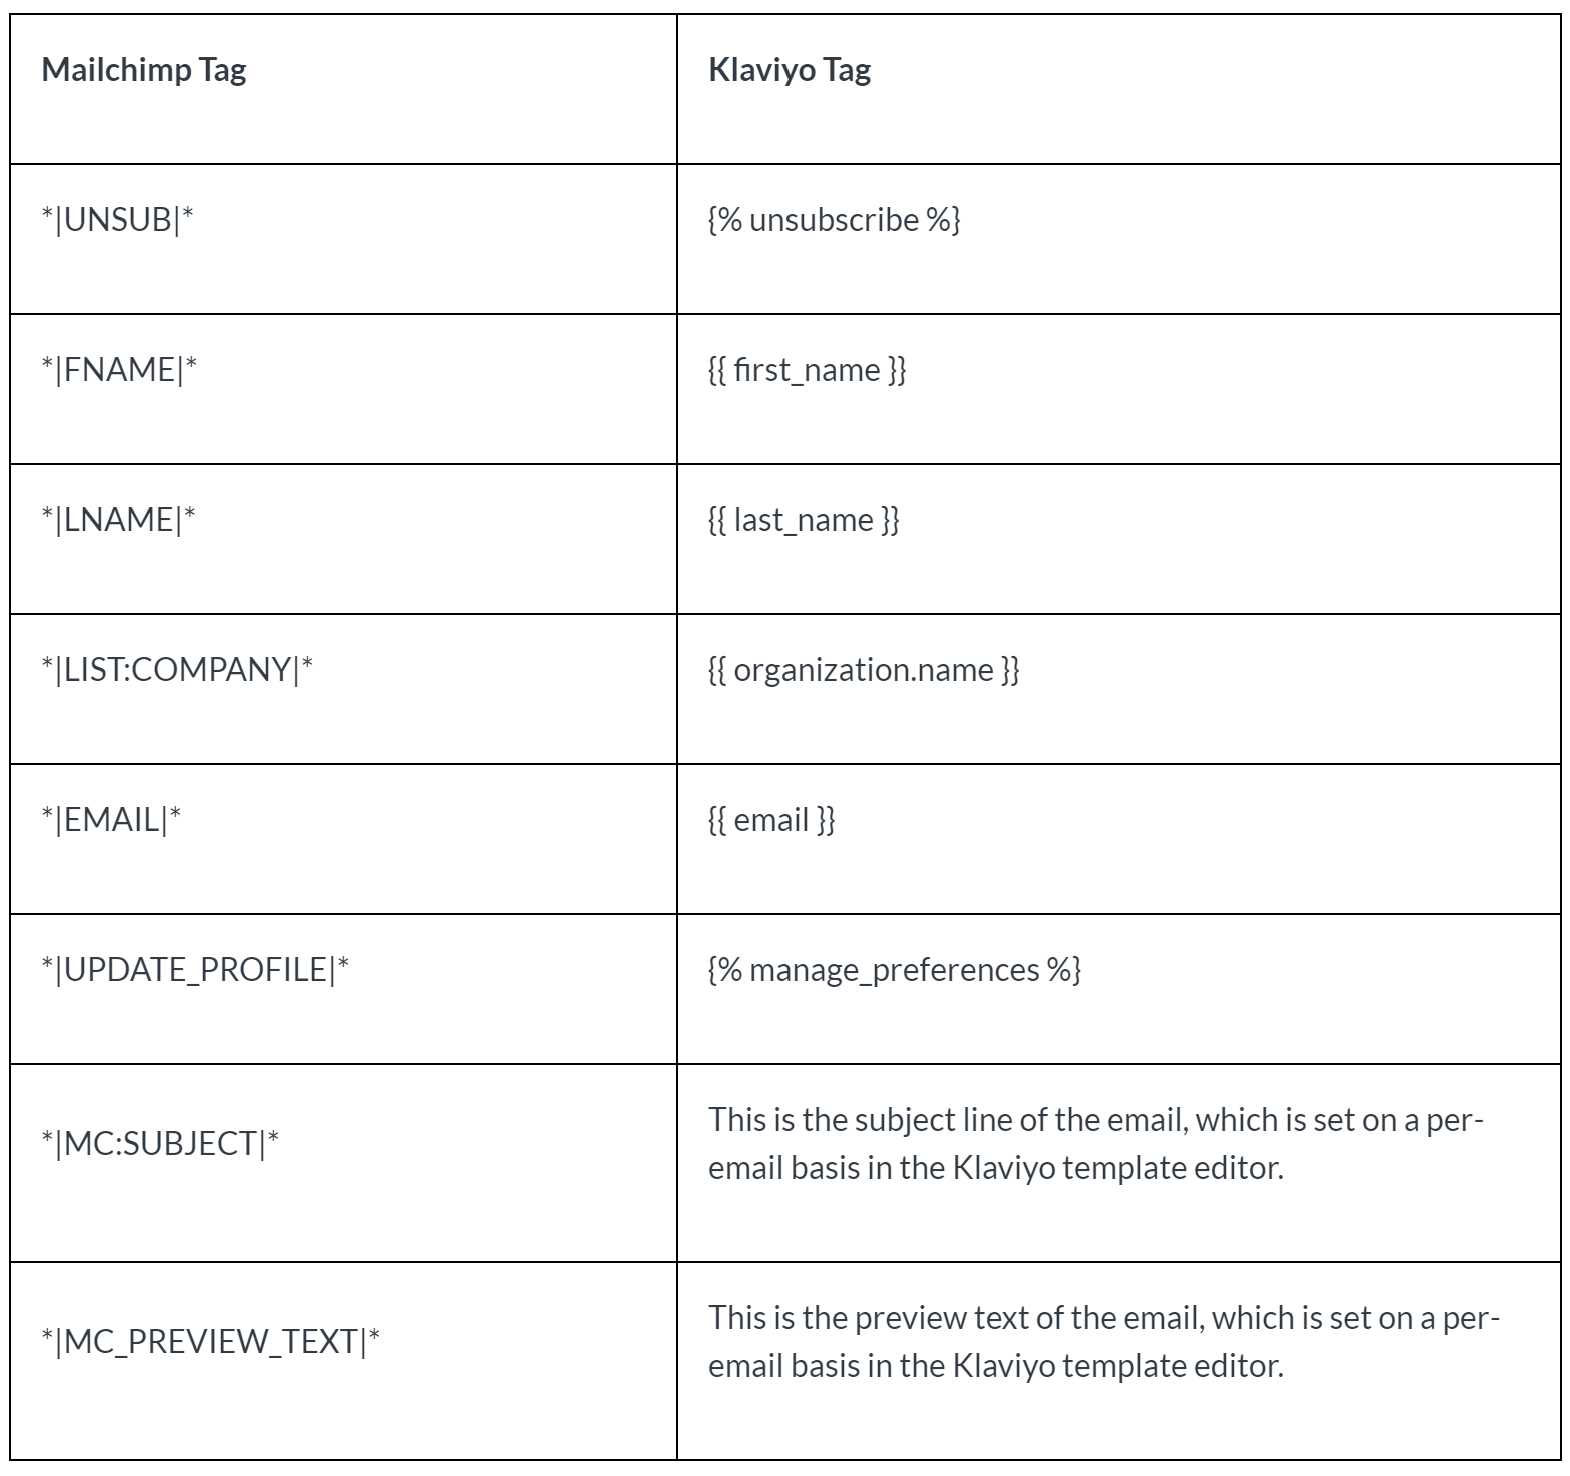
This screenshot was taken from Klaviyo's website.
Deactivating Your Mailchimp Account
After you've moved all of your data to Klaviyo, you can deactivate Mailchimp. Follow the three steps below to ensure that everything works properly in Klaviyo and you no longer need your Mailchimp account.
1. Change all of your Mailchimp signup forms to Klaviyo forms.
You can't redirect the forms that you created in Mailchimp to Klaviyo. You can either manually re-create your signup forms in Klaviyo, integrate a third-party list-growth tool, or integrate a custom form from your e-commerce platform.
Once you've re-created your signup forms, you should monitor new signups for a few days. If new subscribers are still going to your Mailchimp account, one of your forms may still be pointing to the wrong place.
When you're confident that all of your signup forms have been switched, turn off the Mailchimp forms. You can do this by removing the following code from your web pages:

This screenshot was taken from Klaviyo's website.
2. Re-create your Mailchimp automations as Klaviyo flows.
Since you no longer need your Mailchimp automations, re-create them as flows in Klaviyo, and then turn them off in Mailchimp. This will ensure that you're not double-emailing people.
To turn off your Mailchimp automations, click Pause and Edit next to the campaign, and then click Pause in the confirmation pop-up.
3. Turn off the Mailchimp integration in Klaviyo.
Before you remove the Mailchimp integration, double-check that everything is set up correctly in Klaviyo. Review your data and signup forms again. Send test emails from Klaviyo to ensure that everything functions properly.
When you're ready to turn off the integration, go to the Integrations tab and click Settings under the Mailchimp integration. Click Remove and confirm that you'd like to remove the integration.
See how we launch & scale brands on Shopify Plus with a data-backed approach
Sending Emails from Klaviyo
For the first four weeks, send emails to your most engaged subscribers to ensure that you start off strong with Klaviyo.
When you migrated your contacts from Mailchimp, it pulled in their engagement ratings. The ratings are given on a scale of 1 to 5; subscribers with a rating of 5 are highly engaged, while those with a rating of 1 aren't engaged at all.
You'll need to build a segment of engaged subscribers in Klaviyo before sending your first email. You can create your segments under Lists & Segments. Klaviyo defaults to an Engaged (3 Months) segment, but you can decrease the time frame to 30 days and add historical engagement data from Mailchimp.
As you send emails from Klaviyo, review your engagement reports and analyze your open rates. Once your open rates get above 20%, you can expand the segment's time frame. Continue monitoring your open rates before you start sending emails to more subscribers.
Once you've fully set up your Klaviyo account, you can create email flows to reach consumers at different stages of their buying journeys, integrate your account with more than 25 additional platforms, and conduct A/B testing to optimize your email campaigns. With Klaviyo's advanced reporting features, you can also track metrics such as delivery rates and click-through rates and analyze how much revenue your emails generate.
If you still have questions about your Klaviyo to Mailchimp migration, or if you would like to discuss more email marketing tips, contact Avex Designs.